Mirth Channel Setup
Create the Synura outbound channel in Mirth Connect. These steps apply to all versions (3.x and 4.x).
Mirth 3.8.1 users: Do not import channel XML. A known XStream bug causes imports to fail with
InvalidChannel. Create channels manually through the GUI.
1. Create a New Channel
Section titled “1. Create a New Channel”- Open the Mirth Connect Administrator and log in.
- In the left panel, click Channels.
- Click New Channel (or right-click in the channel list and select “New Channel”).
- Set the following on the Summary tab:
- Name:
Synura MLLPS Send(or any name that makes sense for your organisation) - Description: (optional)
Sends HL7 messages to Synura over MLLPS - Leave all other settings at their defaults.
- Name:
2. Configure the Source Connector
Section titled “2. Configure the Source Connector”- Click the Source tab.
- Set Connector Type to Channel Reader (the default). This lets other channels or manual sends route messages into this channel.
- No further source configuration needed.
3. Configure the Destination Connector
Section titled “3. Configure the Destination Connector”- Click the Destinations tab.
- Select Destination 1.
- Set Connector Type to TCP Sender.
- Set Transmission Mode to MLLP.
Using the Synura TLS Proxy (Path A) or Enterprise TLS Proxy (Path D)
Section titled “Using the Synura TLS Proxy (Path A) or Enterprise TLS Proxy (Path D)”If you are using the Synura TLS Proxy (stunnel) or your own enterprise TLS proxy:
-
Set Remote Address to:
localhost -
Set Remote Port to:
2575(Or whichever port your TLS proxy is listening on.)
-
Do not enable SSL/TLS on the Mirth connector. The proxy handles encryption.
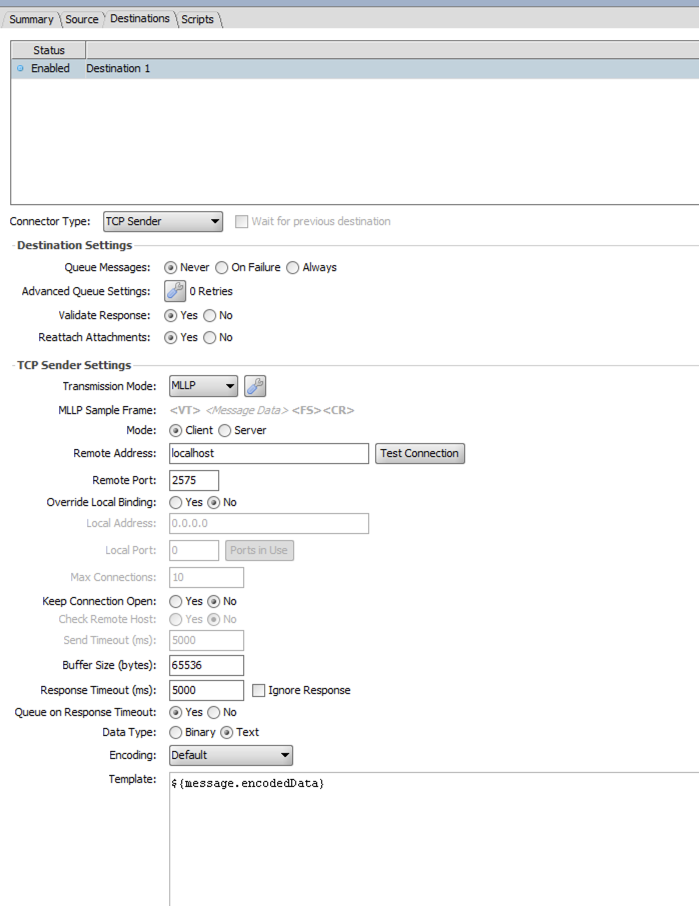
- Leave all other settings at their defaults:
- Keep Connection Open: Yes (recommended)
- Response Timeout (ms): 10000
Using a Commercial TLS Plugin (Path B or C)
Section titled “Using a Commercial TLS Plugin (Path B or C)”If you have the NextGen SSL Manager or Zen SSL Extension installed:
-
Set Remote Address to:
{subdomain}.synura.ioReplace
{subdomain}with your assigned Synura subdomain. -
Set Remote Port to:
443 -
Enable TLS/SSL using your plugin’s settings on the connector. Ensure the minimum TLS version is TLS 1.2.
-
Leave all other settings at their defaults:
- Keep Connection Open: Yes (recommended)
- Response Timeout (ms): 10000
4. Save and Deploy
Section titled “4. Save and Deploy”- Click Save Changes (or Ctrl+S).
- Go to the Dashboard.
- Select the new channel and click Deploy Channel.
- Status should change to Started.
5. Send a Test Message
Section titled “5. Send a Test Message”-
In the Dashboard, select your deployed Synura MLLPS Send channel.
-
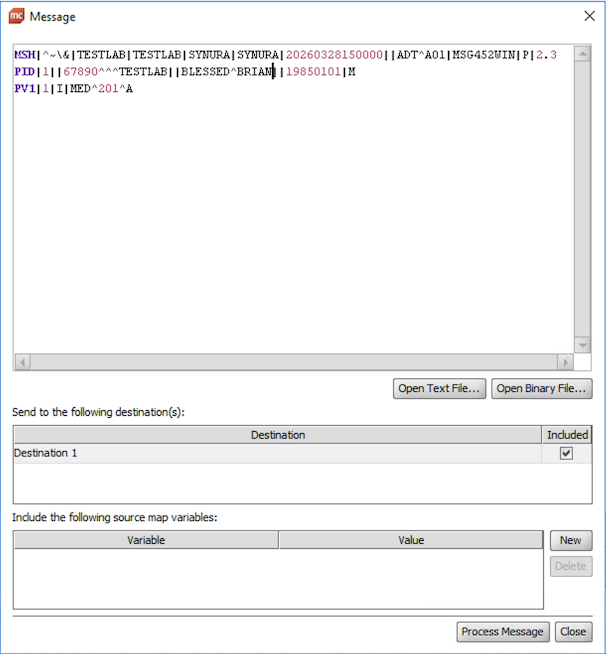
Click Send Message in the toolbar.
-
Paste a valid HL7 v2 message into the text box. A minimal ADT^A01 example:
MSH|^~\&|SENDING_APP|SENDING_FACILITY|SYNURA|SYNURA|20240101120000||ADT^A01|MSG00001|P|2.3EVN|A01|20240101120000PID|1||TESTPID001^^^MRN||TEST^PATIENT||19800101|MPV1|1|I|WARD1^ROOM1^BED1Replace
SENDING_APPandSENDING_FACILITYwith the values registered in your Synura configuration. -
Click Process Message.
6. Verify the Result
Section titled “6. Verify the Result”Successful Send
Section titled “Successful Send”
-
Message status in the Dashboard shows SENT with a green indicator.
-
Response tab for the message shows an HL7 ACK with acknowledgement code AA (Application Accept):
MSH|^~\&|SYNURA|SYNURA|SENDING_APP|SENDING_FACILITY|20240101120001||ACK^A01|ACK00001|P|2.3MSA|AA|MSG00001 -
The message appears in your Synura dashboard inbound log.
Failed Send
Section titled “Failed Send”If the message fails, check the following:
| Status | Meaning | What to Do |
|---|---|---|
| ERROR | Mirth could not connect to the destination | Check Remote Address and Port. For stunnel users, verify stunnel is running. See Troubleshooting. |
| QUEUED | Message is waiting to be sent (destination unreachable) | Same as ERROR — check connectivity. The message will retry automatically. |
| SENT but no response | Message was sent but no ACK came back | Increase Response Timeout. Check that your sending facility is configured in Synura. |
| SENT with AE or AR | Synura received the message but rejected it | Check the MSA segment in the response for the error reason. Common causes: invalid message format, unrecognised sending facility. |
Viewing Message Details
Section titled “Viewing Message Details”- Click the channel name in the Dashboard to open the Message Browser.
- Click a message to expand it.
- Destination tab shows the raw sent message and response.
- Errors tab shows failure details if the status is ERROR.
- Channel Reader source means this channel receives messages from other Mirth channels or manual sends. If you need to read from a file, database, or other source, configure that on a separate channel and route messages to this one.
- Keep Connection Open is recommended for performance. Synura supports persistent connections.
- If you have multiple destinations (e.g. sending to Synura and a local archive), add a second destination to the same channel rather than creating a separate channel.